

Easy Eggless Nankhatai | Nankhatai Cookies || How to make Besan Nankhatai with step-by-step photos and video
Naankhatai is also known as a traditional flaky, buttery cookie. It is a popular cookie in Pakistan that is prepared at a low cost, with an easy and simple recipe. This is the reason easily available at any kind of shop.
History of Nankhatai:
The word Nankhatai is derived from the Persian word Naan, meaning bread, and "Khatai" from an Afghan word meaning Biscuit. In Afghanistan and Northeast Iran, these biscuits are called Kulcha-e-Khataye. Kulcha is a type of bread similar to Naan.

My Latest Besan Nankhatai Video Recipe:
Prepared with?
Nankhatai is usually prepared with all-purpose flour and semolina with butter But
Here I am using gram flour, all-purpose flour, with a little amount of semolina, clarified butter, and icing sugar.
Nankhatai has to be prepared with:
Unsalted or salted butter, but I am using clarified butter. You can make every type of cookie from this clarified butter that I’m gonna share with all.
Note: You can adjust sugar to taste. Here, I used 1.5 cups according to my taste, but you can use an equal amount of icing sugar in the flour.

How to make Clarified Butter?
Clarified butter is made to melt the ghee. Here, I will tell you with pictures first, then I will tell you the nankhatai recipe.
Kindly follow the instructions given in the pictures below.- In a melamine or glass bowl, add ghee
- Microwave for 2 minutes, or you can melt it on the flame as well
- Let it cool till it turns to lukewarm ghee
- Now keep in the refrigerator for ½ hour
- After 30 minutes, take it out of another bowl
- Then whisk it well for 10 minutes or till turns into a creamy texture
If you have tried this Eggless NanKhatai, don’t forget to rate the recipe. You can also follow me on social media.

Like Our Videos? Then, follow and subscribe to us on YouTube to get the latest Recipe Video updates.

Now that clarified butter is ready to use in the recipe, set it aside.

In a bowl, sift 1 cup of all-purpose flour.

Sieve 1 cup of gram flour

Sieve 1/4 cup of semolina and add to the flour bowl

Then add baking powder.

Now add green cardamom powder.


Add salt


Now mix everything, and keep it aside.


Now, add icing sugar to the clarified butter.

Mix them well

Now whisk them together very well for 5 minutes.


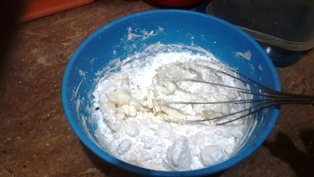
Now whisk them together very well for 5 minutes.

Put a mixture of clarified butter with the dry ingredients.


Mix them very well with the spatula for 5 minutes.

Transfer to the broad surface or marble slab.

Start kneading the dough with your palm.


Until incorporated, to form a soft dough, no need to use water at all

Dough is ready


Dough is ready

Now transfer to another bowl, keep in the fridge for resting for about 10 minutes.

Meanwhile, line the butter paper, and preheat the oven for 1/2 hour at 230 °C.


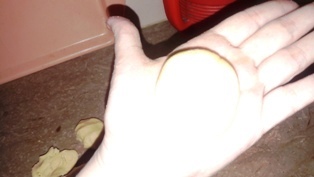
After 10 minutes, divide the dough in half.

Make equal portions of the dough.

Shape into a ball. Sorry that the invoice picture isn't clear.


Bake nankhatai for 12-15 minutes at 150 °C. Keep the nankhatai tray in the center of the oven.


Shape into a ball. Sorry that the invoice picture isn't clear.
Make a smooth ball and place it on a baking tray. Press it lightly in the middle of the ball with your fingertips.

Repeat the same process with all Nankhatai balls.

Sprinkle crushed almonds and pistachios.

Bake nankhatai for 12-15 minutes at 150 °C. Keep the nankhatai tray in the center of the oven.

After 15 minutes, take it out of the oven.

Now Nankhatai is done, leave it to rest for about 1/2 hour
Until it settles down on its own. Note, don't touch any cookie instantly after taking it out of the oven because it is so soft that it takes time to set
Until it settles down on its own. Note, don't touch any cookie instantly after taking it out of the oven because it is so soft that it takes time to set


